
LXC containers are a great method for compartmentalising services in your IT infrastructure. For lightweight internal services, you don’t necessarily need a large powerful server that eats electricity for hosting them. Single board computers like Raspberry Pi are cheap with enough memory and compute power to run a variety of services like vpn, media services, proxy services, web servers etc. For home labs or even small startups, a handful of Raspberry Pi can allow you to build enough tools without breaking the bank. Rather than use one Raspberry Pi per service, we can use LXC containers to run a couple of services within a single Raspberry Pi, provided no one service is highly resource heavy. A Raspberry Pi 4B or 5B models with 8GB of RAM are the most suitable.
By adding an external USB 3.0 SSD, you will have enough storage space to accommodate services that store data locally. The external hard disk also provide easy transplant to a new system if required.
Backup and restore of LXC containers is quite simple. This is useful for taking snapshots of your container when you are installing and building a service in the container.
Debian Install
Prepare the microSD Card
The Raspberry Pi OS Lite can be found here:
https://www.raspberrypi.com/software/operating-systems
Find the device name of the microSD card
lsblkWrite the Raspberry Pi OS Lite to the microSD card
sudo dd if=2023-12-11-raspios-bookworm-arm64-lite.img of=/dev/sdc bs=4M conv=fsync status=progressStart the system
Proceed through the initial setup steps. Once that is completed. run apt to update and upgrade with the latest security and package updates.
apt update
apt upgrade
Ensure SSH has been enabled and make any other changes using:
raspi-config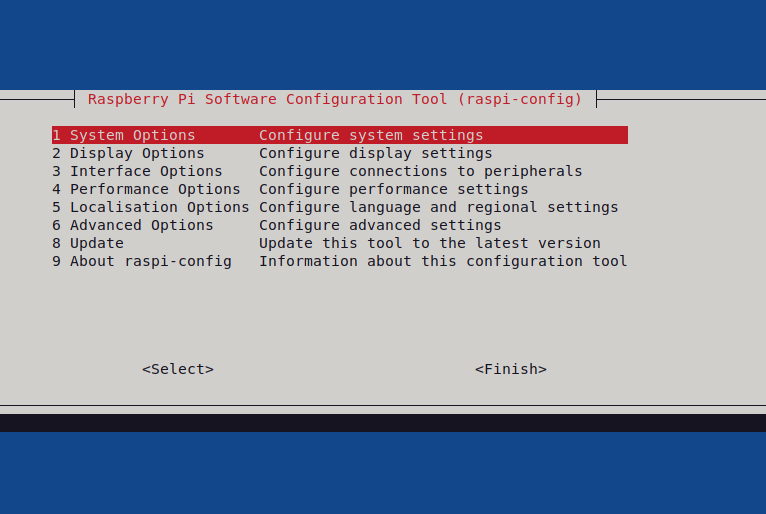
Network Configuration
Edit /etc/network/interfaces to add a bridge interface. Change the IP address and gateway to reflect your network. The vmbr0 interface will allow the connection of the virtual network interface of the LXC container to connect directly to the network attached to the physical eth0 port.
/etc/network/interfaces
auto lo
iface lo inet loopback

auto eth0
iface eth0 inet manual

auto vmbr0
iface vmbr0 inet static
address 192.168.0.22/24
gateway 192.168.0.1
bridge-ports eth0
bridge-stp off
bridge-fd 0
External HD Configuration
Attach USB 3.0 SSD external hard drive to the raspberypi. Identify the hard drive device name:
lsblkOR
dmesgReplace the existing file system partition with a Linux primary partition. Run fdisk on the device name of the external hard drive.
fdisk /dev/sdaDelete any current partitions on the disk ( WARNING: This action will destroy all data on the disk). Create the new Linux primary partition.
Disk model: PSSD T7
Units: sectors of 1 * 512 = 512 bytes
Sector size (logical/physical): 512 bytes / 512 bytes
I/O size (minimum/optimal): 512 bytes / 33553920 bytes
Disklabel type: dos
Disk identifier: 0x7ec204e6

Device Boot Start End Sectors Size Id Type
/dev/sda1 2048 976773167 976771120 465.8G 83 Linux
Write and quit fdisk. Create ext4 file system on the newly created partition.
mkfs.ext4 /dev/sda1Mount the partition to the /opt directory on the raspberrypi.
mount /dev/sda1 /optThe file system will reserve 10% of disk space for root by default. To maximise the storage available on the external disk drive, set the reserve space to zero with the following:
tune2fs -m 0 /dev/sda1Obtain the UUID of the external disk.
lsblk -o +UUIDNAME MAJ:MIN RM SIZE RO TYPE MOUNTPOINTS UUID
sda 8:0 0 465.8G 0 disk
└─sda1 8:1 0 465.8G 0 part /opt ced40755-d3f5-4595-8423-61f9813496ef
mmcblk0 179:0 0 116.5G 0 disk
├─mmcblk0p1 179:1 0 512M 0 part /boot/firmware 5DF9-E225
└─mmcblk0p2 179:2 0 116G 0 part / 3b614a3f-4a65-4480-876a-8a998e01ac9bMounting the external disk at boot can be accomplished by adding the following line to /etc/fstab. Use the UUID of the external disk obtained in the previous step.
/etc/fstab
UUID=ced40755-d3f5-4595-8423-61f9813496ef /opt ext4 defaults 0 2Create a new directory to store LXC containers.
mkdir -p /opt/var/lib/lxc/Reboot the Raspberry Pi and check that everything is working correctly.
LXC
For full in depth documentation on LXC follow the link to the wiki:
LXC Install
apt install lxcLXC Configuration
Edit /etc/lxc/default.conf and change lxc.net.0.link to the bridge vmbr0 created earlier. This will set any new container by default to link the virtual NIC to vmbr0.
/etc/lxc/default.conf
lxc.net.0.type = veth
lxc.net.0.link = vmbr0
lxc.net.0.flags = up

lxc.apparmor.profile = generated
lxc.apparmor.allow_nesting = 1
Create LXC Container
lxc-create -P /opt/var/lib/lxc/ -n <YOUR CONTAINER NAME> -t debian -- -r bookwormAdd a symbolic link to the LXC directory
mkdir /var/lib/lxc/<YOUR CONTAINER NAME>/
ln -s /opt/var/lib/lxc/<YOUR CONTAINER NAME>/config /var/lib/lxc/<YOUR CONTAINER NAME>/config
To verify the container can be seen, use:
lxc-lsIf everything is correct, will be listed in the output.
To add auto start of the container at system boot, edit config and insert the following lines:
#Auto start
lxc.start.auto = 1
lxc.start.delay = 5
Start the container on the system.
lxc-start <YOUR CONTAINER NAME>Check if the container is running.
lxc-info <YOUR CONTAINER NAME>To enter the LXC container:
lxc-attach <YOUR CONTAINER NAME>This new container is a minimal install of Debian. Start by updating the packages before starting installation of any new packages.
apt update
apt upgrade
Install some basics that will likely be useful
apt-get install vim ufw wget curlAt this point you have a blank canvas to start building your desired service.
Backup a LXC container
Shutdown the container
lxc-stop -n <YOUR CONTAINER NAME>Archive container rootfs and config
cd /opt/var/lib/lxc/<YOUR CONTAINER NAME>/
tar --numeric-owner -czvf <YOUR CONTAINER NAME>.tar.gz ./*
Copy the file to backup server and remove file
rsync -avh <YOUR CONTAINER NAME>.tar.gz user@backupserver:/backups/lxc/

rm <YOUR CONTAINER NAME>.tar.gz
Start the container on the system.
lxc-start <YOUR CONTAINER NAME>Moving LXC containers between host systems
Shutdown the container
lxc-stop -n <YOUR CONTAINER NAME>Archive container rootfs and config
 cd /opt/var/lib/lxc/<YOUR CONTAINER NAME>/
 tar --numeric-owner -czvf <YOUR CONTAINER NAME>.tar.gz ./*
Copy the file to the new server
rsync -avh <YOUR CONTAINER NAME>.tar.gz user@newserver:/opt/var/lib/lxc/
Extract rootfs
 mkdir /opt/var/lib/lxc/<YOUR CONTAINER NAME>/
 cd /opt/var/lib/lxc/
 tar --numeric-owner -xzvf <YOUR CONTAINER NAME>.tar.gz <YOUR CONTAINER NAME>/
 mkdir /var/lib/lxc/<YOUR CONTAINER NAME>/
 ln -s /opt/var/lib/lxc/<YOUR CONTAINER NAME>/config /var/lib/lxc/<YOUR CONTAINER NAME>/config
Start the container on the new system.
lxc-start <YOUR CONTAINER NAME>